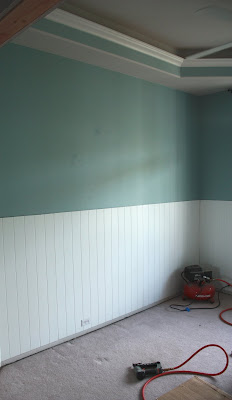
The Problem:
In order to have perfectly matched moldings for the outside walls of our soon-to-be Playroom, we had to remove the original moldings from the interior of the room.
Because we added new walls to the space, the old interior moldings are what we will end up using on the new portions of the outside walls.
(Does that make sense? It even seems a little confusing to me! You can go back here and read where this project began and how far we've come. Maybe then it will make more sense.....maybe!)
Removing the molding on the inside of the room left us with this:

The solution to hiding all of that without having to mud, sand and texture was found in...paneling!
Don't worry - this won't be anything like the paneling from the 70's. This will be light, bright and crisp! Nothing cave-like here.
I have been fond of painted paneling for quite some time and to convince myself that this was the right solution for this room, all I had to do was look at the following blog for inspiration:
Completely Coastal
(Maya's blog is packed with photos that show how great the addition of paneling can be to a room. Just start at the beginning and keep scrolling. The inspiration goes on and on!)
Despite all of the gorgeous-"See! I'm telling you it will look good!"-photos that I provided for him, Will still wasn't convinced about the paneling (he rarely is before the design starts coming to life), but he went along, trusting that I know what I'm doing.
Using his handy little Dremel, he was able to precisely cut the openings for the outlets and light switches...
 He had 6 different spots where he had to cut holes in the paneling, and this tool made the job so easy!
Throughout the day we had a super cute little helper with us. Very focused on her work...
 "I'm workin', Mama. I'm workin'."
The apple doesn't fall far from the tree around here!
Within a few hours the paneling was up...

Now it was time to add our own trim.
We almost always make our own trim from sheets of MDF - Medium Density Fiberboard. This way we can create exactly what we want it to look like, and we get it for a much cheaper price that any trim that you can find in the big home improvement stores.
We did it much like the trim in our Family Room when we did the Board and Batten treatment on the walls. I had originally thought that we would just recreate the trim exactly with the wide horizontal band and the more detailed strip on top like you can see here...

...but the more I looked at it, the more I decided that it was going to be a bit fancy for the look that I am wanting to achieve in the new Playroom.
So we cut the MDF to the same width as the trim in the Family Room (just to keep the looks similar) and nailed it into place...

Nothing fancy.
Just a nice, wide band of trim.
The baseboard was made in the same way. We just added a cove detailing to the top edge and called it good...

 We did finish that last bit of baseboard before shutting it all down though.
Since we played all day today, there hasn't been much more progress made. But I did apply spackling to all of my freshly-cut edges of the MDF after getting the kids tucked into bed tonight. We like to add the spackling to any edges that we've cut and that will be exposed to paint, to ensure a better finish. It seems to produce a cleaner look when all is said and done!
Since we're still waiting on the french doors to arrive (tomorrow is supposed to be the day - fingers crossed that the shipment comes in on time!) we couldn't finish the paneling or trim work completely. The small sections of wall on either side of the door frame have been left blank. Once the doors are installed we can finish up the paneling and trim on the walls and painting can begin.
I cannot wait!
All of the paneling and new trim work will be painted out in white and will make this room feel like a completely different space.
Once I can start painting, it won't be long before the job is completed!
Currently, we are in negotiations about that very thing...paint. And decor. I learned tonight that it's three-against-one. The boys and Will have their own idea about how the finished room should look, while I have other ideas.
Looks like I'm being out-voted!
Time to work on a new design plan...

P.S. Don't forget - Thursday is DIY Day over at A Soft Place To Land!
Be sure to check it out!
Labels: Dining Room, Makeover, Paneling, Play Room, Trim
Subscribe to:
Post Comments (Atom)


0 comments:
Post a Comment