Showing posts with label Makeover. Show all posts
Showing posts with label Makeover. Show all posts

A few weeks back, I was lucky enough to catch a great clearance sale. I happened to be at Target, browsing and looking for inspiration when I realized that they were rearranging merchandise and putting out their 75% Off signs.
Nice!
They only had a few of these...
 A Photo Serving Tray - originally priced at $19.99, but marked down to $4.98.
SOLD!
I knew immediately that I would not be using it for photos, so as soon as I got home, I removed the entire back piece and pulled out the matting. I was left with this...
 A Photo Serving Tray - originally priced at $19.99, but marked down to $4.98.
SOLD!
I knew immediately that I would not be using it for photos, so as soon as I got home, I removed the entire back piece and pulled out the matting. I was left with this...
 The perfect blank slate to make it my own!
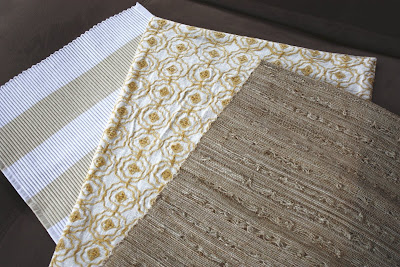
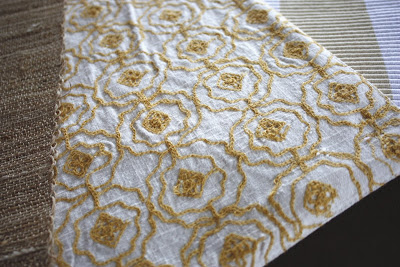
Over the next couple of weeks I found 3 different placemats to use inside my serving tray - all three within the same neutral color family and all three with lots of texture and interest.
The one on the left came from Fred Meyer for less than $1.00 (can't beat that!) and the others came from Target...


 Yep - good to go!
I removed the entire back (again), not where the photos would be inserted, but the entire back...


 It wasn't until after I had drawn the lines that I realized that this placemat was lined. And suddenly I was nervous that without the lining the stitching would all fall out as I cut out the shape...
 (Note: I do not sew. I know nothing about fabric and thread and whatever else goes into it. So if this "worry" of mine sounds ridiculous to you, it probably was.)

I used extreme caution with this fabric (whether it was necessary or not) and, luckily, the thread all stayed in tact...

I have to admit, I did feel a little bit guilty cutting up three
brand new, perfectly good placemats...
brand new, perfectly good placemats...
 But I got over it!
I loved how they were turning out...
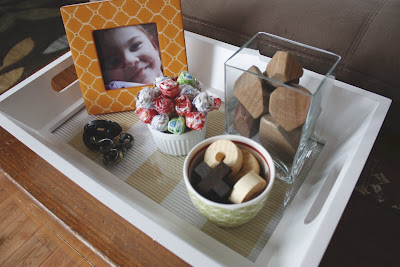
 Now the fun part...accessorizing!
A beachy look for the seagrass...

And that's my clearance tray - three ways!
 The best, BEST part...I can change it as often as I like! And the options are limitless.
This is a Made-for-Karla accessory right here.
:)
My only regret...that I didn't buy more of them when I had the chance!
I think this would make a great gift for someone, personalized to their style and decor.
I'll just have to be on the lookout for more!

P.S. I am linking to:
Metamorphosis Monday, Get Your Craft On, Just Something I Whipped Up, Show & Tell, Before & After Party, Make It Yours, Works For Me Wednesday,
Labels: Accessories, Decorating, Makeover
This is day 2 of my current project, and convincing Will that it would actually be successful in the end took a whole lot of smooth talking.
The idea came to me during the holidays last year. I wanted the hutch in my kitchen to be moved because it made for a slightly cramped feeling in our eat-in-kitchen, but there isn't another spot that we could have put it in our home.
So my crazy idea was born out of my desire for change, and Will's absolute refusal to not have to store any furniture out in his shop.
Thanks to my ability to think outside of the box, I got two new pieces of furniture from two old pieces of furniture.
The base of our hutch is now sitting in our family room right next to our kitchen, acting as a buffet and I love it! Can't wait to get some fresh paint on it!
The top of my hutch is now in...
Ellison's room.
Really!
And it looks like this...

Stay with me on this one. I know it doesn't look great right now, but hang on...
Ellison's dresser is the kind that acted as our changing table when she was a baby, but those days are now long gone. That extra drawer on top caused a bit of trouble in making this idea work, but we came up with a solution to keep the top of the hutch supported so that it could sit on top of her dresser. Will built an "L" shaped support to fit directly under the hutch so that once painted, it would visually be a smooth transition from one piece of furniture to the next.
The doors on top used to have glass in them, but we replaced that with left over beaded board that came from a previous project. I am storing all of the kids' bed linens up there, so having closed off doors is a must...


I love my hutch and getting rid of it is something that I'm not ready to do. Not only is it a great, solid piece of furniture, but it was one of the first pieces that Will and I bought after we got married. It has sentimental value to me. Luckily, I still think it's just as pretty as it was the day we bought it. But it has moved from house to house, through four different moves, and in certain areas it definitely shows it. A good coat of paint will have it looking brand new...


Will and I are heading to Home Depot as soon as I hit "publish" on this post and I'll bring home a gallon of fresh, crisp, white paint. Once the painting is done I'm going to give it a surprise pop of color to help further tie the two pieces of furniture together, and reinforce the girly-girl feeling of Ellison's room.
Don't tell Will, but I had my own secret doubts about this project. I so badly wanted it to work, but I wasn't certain that it would. The last thing I wanted to happen was to end the project with a massive piece of furniture that clearly looked like a crazy idea gone bad.
But I have to say...I think it's going to work!
Even with just the primer on we can already see what it's going to look like in the end.
I'll keep you updated on the progress.
And keep your fingers crossed for me that,
in the end, it all turns out just like I hoped!

Labels: Furniture, Makeover, Painting, Re-Purposed
I have three words for those of you considering transforming a closet in your home into a bookcase...
GO FOR IT!!!

Now that the closet-turned-bookcase project is complete and Owen has been living with it for over a week, I can easily say that this is one of the best decisions we have made in making our home work for us.
The last photo I left you with in my previous post was this:

We were working on getting the shelves cut and installed and making sure that the whole thing was stable enough to hold all that we intended for it.
Once the shelves and supports were in place and secured...

the tops and bottoms of each shelf got a good, solid coat of paint. I painted it the same blue as I had painted the inside of the closet so that they would blend in...

Pine trim was cut to face each shelf. I painted it white to match the existing trim around the closet and throughout the room...

Once that was done, we were ready to get all of Owen's belongings out of our room (where they sat during this project) and put into place in a newly organized fashion.
Canvas bins were filled with marble tracks...

We stacked all of our family board games up high so that they would stay out of reach from little hands...


And his buildings from his train set were placed on top for display, but are easy enough for us to reach when he feels like building a new track...

Everything below the game shelf is easily accessible for Owen.
Easy to get out and, more importantly, easy to put away...

Owen is still getting used to sleeping in a room without his big brother, so I came up with an easy way to give him a nightlight.
A push light hung on a nail on the inside of his closet illuminates his train track buildings and let's him dream up new track designs before falling to sleep...
 I thought it was a clever idea.
And Owen loves it!
So, once again, I say...
if you're considering doing this
(and I know many of you are based on your comments on my previous post)
GO FOR IT!
You won't regret it!
 What was once a constantly messy, good-luck-trying-to-find-the-floor, little boy's room...
is now an organized, cozy space to be in. The boys are happy to play in there, setting up marble tracks, playing trains and competing in rousing games of Connect Four and Dominoes.
You won't find any regrets here!
But I have to say, I think the key to keeping this bookcase easy and do-able for Owen was not placing any hard rules on where things belong. The canvas bins fit on two of the shelves and his lego bins fit neatly under the first shelf. The shelf above his lego's has been kept open and he is free to arrange it as he sees fit. His canvas bins can be filled any way that he likes. I thought about labeling them, but decided against it. Easy for Owen is the main objective. As long as there is room for everything to fit, I don't mind where he puts it on the shelves.
And, luckily, it has been working!
Along with a closet overhaul, Owen also got a fresh take on his decor...
So what are we working on now?
It's William's turn for his room to get a whole new look.
And we're loving the results!
Pictures to come...

P.S. I am posting this at:
Make Your Monday at Twice Remembered
Metamorphosis Monday at Between Naps On The Porch
Make It For Monday at Cottage Instincts
DIY Day at A Soft Place To Land
Today's Creative Blog for Get Your Craft On
Blue Cricket Design for Show And Tell
Transformation Thursday at The Shabby Chic Cottage
Mustard Seed Creations for Furniture Feature Friday
Labels: Carpentry, Closet, Kids' Rooms, Makeover
Subscribe to:
Posts (Atom)


