


Showing posts with label DIY. Show all posts
Showing posts with label DIY. Show all posts
Yesterday, the latest Land Of Nod catalog came in the mail. I love The Land Of Nod. But this time of year, my kids are all about it!
When the catalog comes, I have to quickly flip through it before they get their little hands on it, never to be seen again.
As I was flipping, this page caught my attention...
 More specifically, the snowflake garland.
In our house, paper snowflakes are created from the first frost until the first signs of Spring. We must make hundreds of them (seriously!) from Fall through Winter.
I am happy to make them and I got lucky enough to have a child that, quite possibly, likes making them even more than I do. That's my Owen!
The colorful snowflake garland from The Land Of Nod, called "Flurries In A Hurry" (cute, right?) is made of felt...
 ...but who needs felt when you have construction paper? On hand. Ready to use.
Since today was a Snow Day and the kids were home from school, Owen and I got to work right away...

19 snowflakes later, we had our own festive garland!
And I love it!

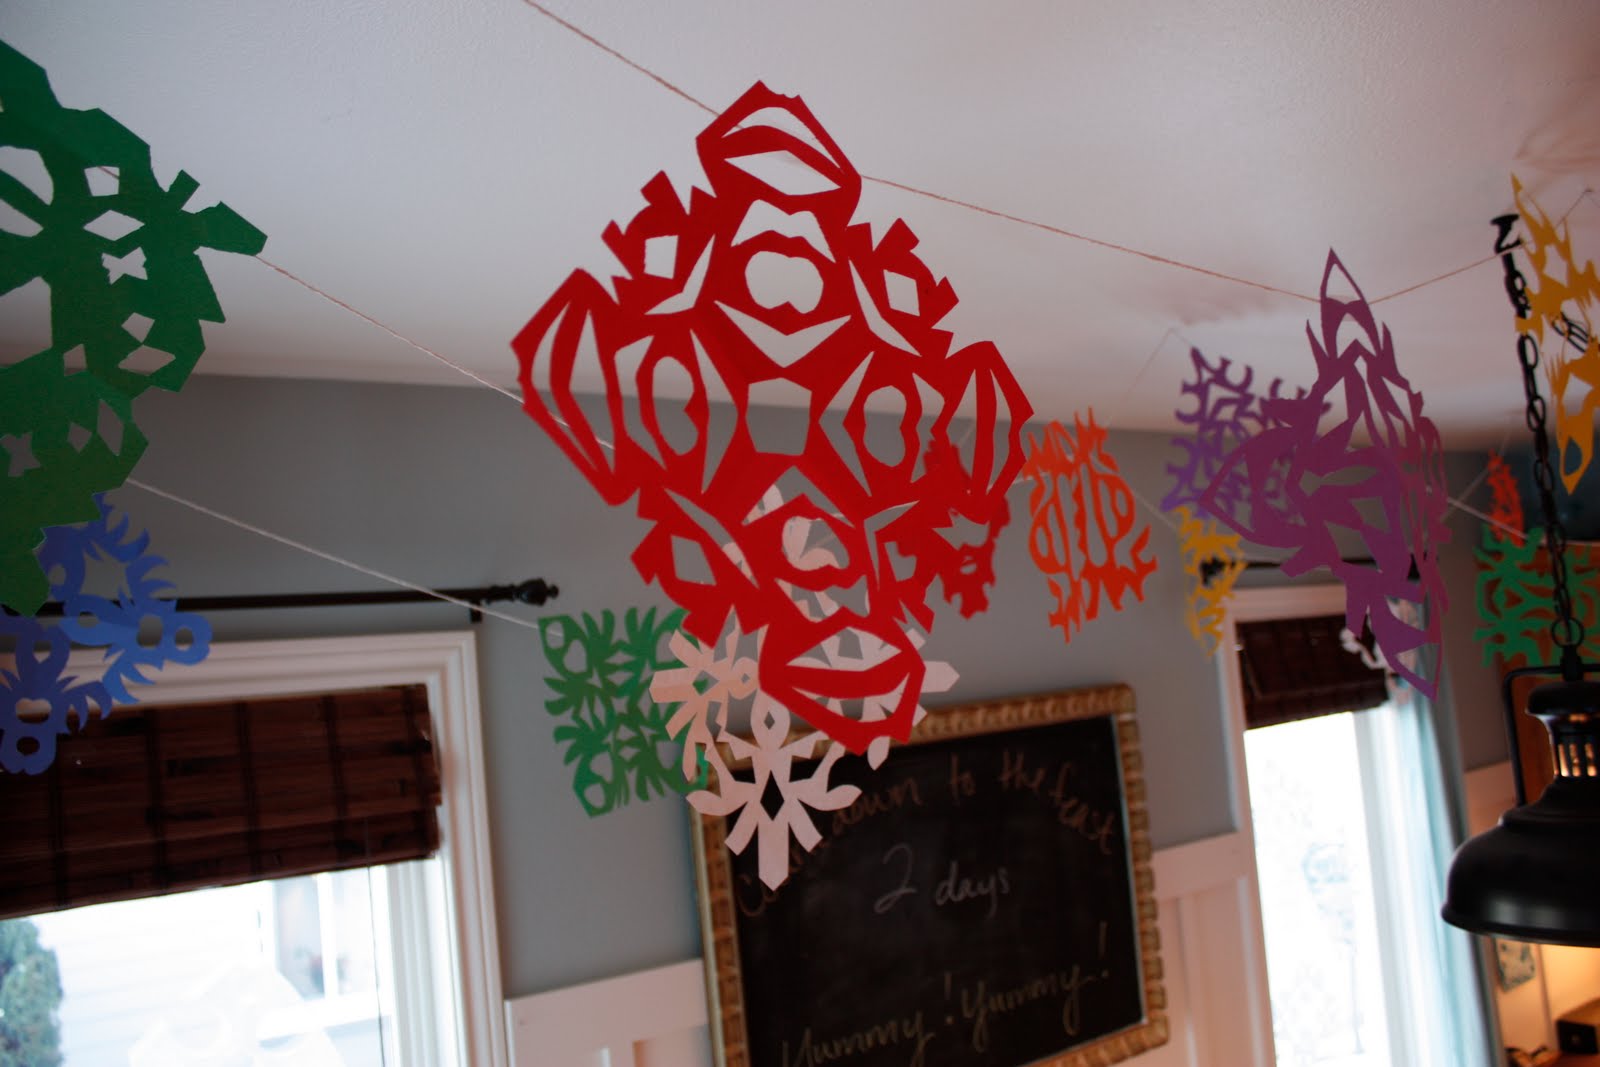 I used regular string and thumb tacks to attach it to the ceiling - one on each end of the string, and one in the middle...
Every year, we always do white snowflakes, but with these,
it feels like a party in here!

So, not only is that more than $30.00 saved, but we didn't have to wait for it to be delivered, and...
the best part was listening to Owen point out all of his creations tonight during dinner, as we dined under a canopy of colorful snowflakes...

It's beginning to look a lot like Christmas...
Happy Holidays!

P.S. I am linking to:
Between Naps On The Porch, Sumo's Sweet Stuff, The Girl Creative, Today's Creative Blog, Blue Cricket Design, The Thrifty Home, My Backyard Eden, The Trendy Treehouse, These Creative Juices, Someday Crafts, The Shabby Chic Cottage, The Shabby Nest, Chic On A Shoestring Decorating, Funky Junk Interiors, Be Different...Act Normal,

I was over visiting my friend Marian at Miss Mustard Seed this week and I have to tell you her recent project stopped me in my tracks.
Marian took a $6.00 dresser she purchased at an auction last fall and turn it into a work of art!
The veneer was chipped and bubbled and beyond her ability to repair. So, she decided to paint it and then cover it with antique sheet music. Isn't this a wonderful effect?
 And in case your feeling crafty and inspired she has more photos and the step by step instructions here.
This is only one of her many projects, so don't miss a visit to her blog, Miss Mustard Seed.
By the way, she is part of So You Think You Can Decorate Competition; so if you want to see other great projects, or vote for hers, click here.
Thanks for inspiring us, Marian!! I am off to search the attic to see what I can create!!!
By the way, she is part of So You Think You Can Decorate Competition; so if you want to see other great projects, or vote for hers, click here.
Thanks for inspiring us, Marian!! I am off to search the attic to see what I can create!!!

There are 3 things you should know about this Master Bedroom makeover:
#1. Nothing was purchased for this makeover. Everything in this room either came from other rooms in our home (I shop my house...a lot!) or was given to us, or was accomplished long before another makeover was even a possibility (ie: the wall color). In other words, this "new" look for the room didn't cost us a penny this time!
..........................................................
**Since paint color seems to be the biggest question on everyone's mind**
It is called Templeton Gray by Benjamin Moore #HC-161
I painted our room this color well over a year ago, and have always loved it! Even my skeptical-"you're seriously going to paint our bedroom gray when we live in the gray, rainy Pacific Northwest??"-husband, has become a fan!
................................................................
#2. This makeover was a plan that I had been wanting to turn into a reality for a while now, but because of all the work involved it wasn't ever put on the priority list to actually happen.
One newly acquired item pushed the entire makeover into action!
#3. Sometimes a little "smoke and mirrors" is all it takes to pull off a little magic!
Here was the problem:
Our room has an odd layout. It's not terrible, but we can't quite figure out exactly what the builder was thinking.
(You'll see what I'm talking about in a second)
Because of this particular layout, we had two choices for where we could put our bed: on the longest wall, which faces the bathroom (no thanks!),
or on the shorter wall which gives us a view of Mt. Rainier.
I think the choice is obvious, right?
Having our bed on the shorter wall meant that our bed had to be pushed over to the side leaving only 2 and 1/2 feet of walking space between the bed and the wall.
It was a tight squeeze!
Here is the Before:

And here is the After:
 We gained an additional 30 inches of space, which not only centered the bed in the middle of the room (instead of the middle of the short wall), but made it so that the bed is now nearly 5 feet away from the wall that it was once so close to.
Nice!
In this next photo you can see the "problem" in the room.
See it there on the right hand side?
Most of it is covered by the drape...
Before:

The builder made the entrance into the Master Bathroom
5 feet wide
Seriously.
Why...why would anyone need a 5 foot entryway into a bathroom?
This 5 foot entryway is why we had such little wall space to center our bed on.
But remember the "smoke and mirrors" that I was talking about?
Here you can see it in action...
After:

We centered the bed in the middle of the room and used the drape to cover the side of the entryway closest to the bed. So now, instead of walking through the entry on the left side, we walk through on the right.
Covering the wall with drapes hung on either side of the bed made it appear as if the wall is longer than it actually is. This allows me to put my bedside table in front of the faux wall!
See?
Sometimes it is all about pulling off a little magic!
This next picture shows just how tight of a squeeze it was between the bed and the wall...
Before:

And After:

Ahhh...
a little breathing room is good!
Our big mirror stayed exactly where it was pre-makeover, and the reflection in it is so much prettier now than it was before...

Ok...
brace yourselves.
I'm going to show you a picture of
BEFORE the Before.
This is how it looked when it was put on the market to sell...

There are so many problems with this layout.
Even the old owners couldn't figure out how to make the room work the right way. They had the bed directly in front of the french doors and their view was of the bathroom! Not to mention the fact that you could see the bed from the front door, and vice versa!
Not pretty!
This is how it looks from the same angle, now...

Did you notice how much the color of the room changes between day and night?
I love, love, love this color in the evening!
For me, it is the perfect mix of cozy, sophisticated and romantic!
Now, onto which items made their way into this makeover from different areas of our home...
Our Riddling Rack!

I am thrilled about this addition to our bedroom!
Its old home was in our Dining Room, but when we turned the space into the kids' new Playroom, the riddling rack had to be taken down, without any good options for where to rehang it.
I thought about selling it, but couldn't bring myself to do it. Will built this and I love it!
Now, instead of holding wine, it holds candlelight...
Uh-huh...I told you it was romantic!
I wired some of the jars from my sister-in-laws wedding onto it and in the evening it gives off the perfect glow.
I am quite happy about this addition!
Three of our favorite wedding photos used to hang across the room on the opposite wall, so they just made a simple change of place...


They didn't quite fit in with the feel of the "new" Playroom, so they made the move over to our bedroom.
Our bookcases made the move as well...


We love having them in our room now!
They hold all of our favorite books, but when they were in the Dining Room they were a little too accessible to a certain little three year old. She used to rearrange them for me.
She thought she was helping!
And here is the entire reason for the change...
I should preface this by saying that, I am not a "TV in the bedroom" kind of person. That was, until we were asked to store my sister-in-law's TV for her while she and her new husband spend the next 3 years living in Germany.
Let's be real here...
it wouldn't have mattered if I had said "no thanks" to the TV. Will had already decided that we were saying "yes" to the offer of the 43 inch plasma. And I'm fairly certain any other man would have done the same, right?
This "new" TV is slightly bigger than our TV, so we moved our TV out of the living room and into our bedroom (along with the frame that Will built for it) and the "new" TV now hangs in the living room (awaiting its own frame to be built).
 Below the TV sits the console table that Will built me when we lived in AZ. Next to it, my garage sale chair, and on the other side, my garage sale oar showing off its "918".
Nearly everything else you see, was in our bedroom prior to the makeover. Although, a few additional accessories did find their way into our room to give it a more completed look.
Overall, a good rearranging was all it took to make the space feel new to us!


Many of you have asked about the "art" above our bed.
This came as the result of a bad pruning accident that happened in our backyard.
We had a gorgeous cherry tree, but it was diseased in a portion of the trunk when we moved into this house. We knew it would eventually have to come down, but we were going to hang onto it for as long as we could. A couple of summer's ago, Will was out pruning and got two of the branches mixed up and accidentally cut off the wrong branch!
The best branch!
Still makes me cringe just thinking about it.
Determined not to let such a beautiful part of our tree go to waste, I started brainstorming ideas of what I could do with it.
The result:
We strategically cut the branch into pieces that we could fit together on the wall, so that they could then be framed out by a huge frame that Will built.
I spray painted the branches white to make them stand out and painted the framed in wall a rusty red.
We were happy!
We got to keep our tree and we created handmade and original art!
 I was planning on going for the same look above the bed while we were in the midst of this makeover, but halfway through, my sister-in-law let me know that she had left-over grass cloth wallpaper from a project she had done in her own home.
Excellent!
Instead of gluing it onto the wall (because things around here change so often) we used staples to get it to lay flat on the wall.
We love it...
 It was the "look" that I had always wanted for the branch, but didn't want to spend extra money for the grass cloth.
I guess good things do come to those who wait!
The branches are nailed in place with brads from our brad nailer. We trimmed the ends of the branches at an angle so that each one would fit tightly in the corner and snuggly next to the other. We have never had a problem with them staying in place. We just nailed them in the spots where the branches naturally touch the wall...

In the end, it was a lot of work, but fortunately everything I needed was right here in my own home! Laundry was put off for a few days, dishes piled up on the counter and I lived in sweats and a t-shirt, fully engrossed in making this room a better version of itself...

So what is the moral of this story, you ask?
If a room in your home isn't working right for you - if there is just something about it that doesn't sit right with you - change it!
Have an open mind about moving furniture and accessories from other parts of your home into places that seem unexpected. I never would have thought that our Riddling Rack would ever hang in our bedroom. But it is unexpected, and it is the perfect way for us to use it!
You never know...the results that you achieve may end up being your own perfect space, tailored exactly to your liking...
Just as your home should be!
......................................................................................
I have received many questions from you about our bedroom, but haven't had a chance to get back to you all. Hopefully, many of your questions were answered within this post. But just in case you still have a few, I plan on doing a "Q & A" post about our bedroom in the future. If you have a question, please ask me in a comment on this post.
Thanks so much for all of your interest in this project!
I appreciate it more than you know!

P.S. I am linking this post to Transformation Thursday at the Shabby Chic Cottage
and Thrifty Thursday at Tales From Bloggeritaville
and Frugal Friday at The Shabby Nest
and Beautiful Life Friday at The Inspired Room
and Metamorphosis Monday at Between Naps On The Porch
and DIY Day at A Soft Place To Land
That's our number.
918
It represents September 18th, which is the day, waaay back in 1993, that we started dating.
So when I was looking for a way to add a little visual interest to one of the oars I got while thrifting this summer, it hit me...
918
perfect!
Remember the oars?
They were just meant to be in my house. It was pure luck that no one had swiped them before I got to the Garage Sale...

One of the oars found a home in our entryway from the garage, but the other has been leaning in a corner of our living room, waiting to be put in just the right spot.
As I said a few days ago, final details are being worked out in our Master Bedroom...
this oar was one of them.
It just needed a little extra something to make it special.
That's where 918 comes in.
Since many of you have asked in the past just how I get my letters and numbers on signs and furniture, I thought I would take this opportunity to show you.
First, I find my font on the computer and then size it to fit my project...
(make sure you change the character setting to "outline" - no need to waste black ink printing out solid numbers)

After I print them out, I cut it down to size so that it will fit on the area to be painted. This will be my tracing paper...
 (the G.I. Joe figures were left out from Owen's birthday party the night before...a common accessory found on our counters, tables, floors...)
Once I have my tracing paper spaced just right, I tape it down only on the top side...

For your project you will need white or black transfer paper depending on the base color of your project and the color of paint for your lettering. In this case, I was going for white letters and my project surface was fairly dark, so I went with white transfer paper...

I slide my transfer paper under my taped down tracing paper...

and start tracing...

It is worth it to stop and check that your numbers are transferring onto your project surface. I learned this the hard way, on a sign that had a whole lot of letters! It only took once to learn that lesson!

After my tracing is done and I am sure that my lines are clearly visible, I remove the transfer paper and take off my tracing paper...

Now it will be a cinch to fill in the numbers...

I use a paint pen for all of my lettering. You can find them at Michael's, JoAnne Etc, even most of the one-stop shopping grocery stores. To see an example, click here.
The paint pen that I used for this was on it's last leg. Not much ink left in it at all...but, it ended up working to my advantage! It just meant that I wouldn't have to do any sanding to remove some of the paint. I was going for old and aged, and that's what my nearly empty paint pen gave me...


Now...to hang the 7 foot tall oar vertically on the wall...

I had Will drill a hole through the handle and then I strung thick rope through it. I wrapped the handle in a haphazard way (I liked the look!) and then just hung it on a nail.

And there 918 hangs...


Just a number on an oar.
A random number to those who see it,
but a visual reminder of our beginning, for us.


Before and After pictures of our Master Bedroom are coming soon.
I promise!
P.S. I will posting this for DIY Day at A Soft Place To Land
and Metamorphosis Monday at Between Naps On The Porch
I promise!
P.S. I will posting this for DIY Day at A Soft Place To Land
and Metamorphosis Monday at Between Naps On The Porch
Subscribe to:
Posts (Atom)


