


Showing posts with label Fireplace. Show all posts
Showing posts with label Fireplace. Show all posts

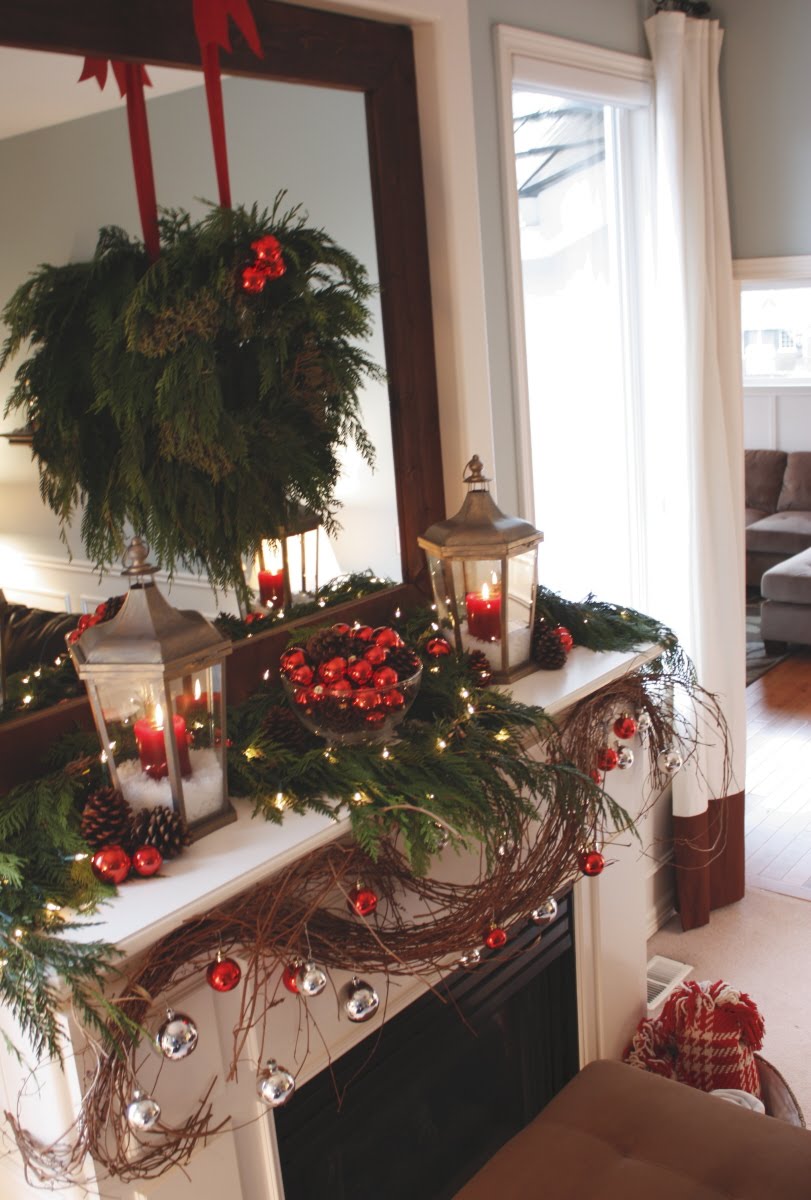
I had only one objective for this years Living Room Christmas Mantel...
keep the grapevine garland that I used for my Thanksgiving Mantel up on the fireplace, and incorporate it into the design.
That's it.
For one, I like it there. I like that it gives a whole new dimension to the fireplace, on top of being natural and rustic. But my other reason (which is probably the real reason) is that it was such a pain to get up there in the first place that I need to keep it up as long as I can and make all of the effort that Owen and I put into getting it to stay in place, worth it!
Luckily, it was easy to incorporate, and I think it worked out wonderfully...
 The grapevine garland was the perfect (and obvious) place to hang Christmas balls - in red and silver to match our Christmas tree on the other side of the room...
The rest of the mantle came together easily, using just a few simple items:
a recycled glass bowl to hold red glass balls and pinecones...
 large lanterns to hold red candles and a bit of faux snow...
 (the best faux snow I have found, in fact!)
 a basket of cozy blankets, which are a must in our house...
 my birch logs...
 an inexpensive cedar wreath (just $8 - seriously!) hung with some sturdy indoor/outdoor ribbon...
 and the "Christmas" sign that I made a few years back...
 ...was all it took to create this Christmas mantel.

The ottoman sitting in front of the fireplace came with our sectional that we purchased for the Family Room this past summer, but I'm not big on "sets" and like to break them up as much as I can. So the ottoman sits here. Unfortunately, we don't ever use this fireplace - it has a glass front that gets really, really hot and with three kids and a puppy running around, I'd rather not take the chance at someone brushing against it and getting burned.
But this way actually works out quite well. The ottoman gets used in the Living Room, in that spot, way more than I thought it would, which is great...

...but I'm thinking this just might be the perfect perch for the kids...
it's time to snap some Christmas pictures!
:)
Happy Holidays!

P.S. I am posting this at:
 Layla's Holiday Home Mantel Party, Today's Creative Blog, The DIY Show Off, Blue Cricket Design, My Backyard Eden, Somewhat Simple, The Shabby Chic Cottage, Beyond The Picket Fence, Funky Junk Interiors, Tatertots and Jello, Chic On A Shoestring Decorating, The Shabby Nest, Finding Fabulous,
it's time to snap some Christmas pictures!
:)
Happy Holidays!
P.S. I am posting this at:
Layla's Holiday Home Mantel Party, Today's Creative Blog, The DIY Show Off, Blue Cricket Design, My Backyard Eden, Somewhat Simple, The Shabby Chic Cottage, Beyond The Picket Fence, Funky Junk Interiors, Tatertots and Jello, Chic On A Shoestring Decorating, The Shabby Nest, Finding Fabulous,
The goal this year was:
1. Use what I have (as much as possible).
2. Keep it fun, colorful, and whimsical for the kids.
3. Make it glow.
4. Bring the outdoors in.

Did I achieve all of my goals?

I think so! And I love it.
And so do the kids, which is what really makes me happy!

I started with cedar garland. I cannot resist cedar at Christmas time. Cannot. It makes its way into our home every holiday season. I love how it looks, how it smells and how it ages over the month of December.
(Live greenery can be such a mess, but in my opinion, cedar is one of the least messy of all the evergreens!)
I buy it at Costco or at Fred Meyer, which sells 15' lengths for $14.99.
(This was my one purchase for this mantel. A must-have at a darn good price, if you ask me!)

Then I added a single strand of C-7 Christmas lights.
Want your mantel to glow? Use C-7's. You will not be disappointed!
Then I added some bead garland to add more pops of red into the overall look...

I bought this Advent Calendar last year at one of our local Holiday Bazaar's. It is made to stand on a table, but I wanted it to stay out of reach from little hands, so I added a sawtooth hanger on the back and hung it up here...

Next...the hanging ornaments.
My absolute favorite part!
I just used thin gift wrapping ribbon, looped through the top of each ornament. Then I used small, white thumbtacks to secure the ribbon to the ceiling...

The ornaments are shatterproof (ie: plastic), so if something should happen and they were to fall, I don't have to worry about broken glass across the hearth and wood floor...

I finished it off with my ribbon wrapped candles, and the J O Y sign that I made last year, to sneak in a little bit of that fresh lime green color...
and last, but certainly not least, our spot for the kids to put their letters to Santa...

My mother-in-law made our stockings for us year's ago, and as we added kids, she made more stockings. They are the perfect colors and fit in beautifully every Christmas...
 The kids were in charge of the tree in the Family Room this year, and I love how it all looks together...
And there you have it...

Our inexpensive-use-what-you've-got-colorful-whimsical-glowing-cedar-loving-Christmas mantel.
Whew!
Now...time to sit down on our cozy couch with a mug of hot chocolate and a magazine, and enjoy it.
Happy Holidays!
P.S. I am posting this at:
 Layla's Holiday Home Mantel Party, Today's Creative Blog, The DIY Show Off, Blue Cricket Design, My Backyard Eden, Somewhat Simple, The Shabby Chic Cottage, Beyond The Picket Fence, Funky Junk Interiors, Tatertots and Jello, Chic On A Shoestring Decorating, The Shabby Nest, Finding Fabulous,
Whew!
Now...time to sit down on our cozy couch with a mug of hot chocolate and a magazine, and enjoy it.
Happy Holidays!
P.S. I am posting this at:
Layla's Holiday Home Mantel Party, Today's Creative Blog, The DIY Show Off, Blue Cricket Design, My Backyard Eden, Somewhat Simple, The Shabby Chic Cottage, Beyond The Picket Fence, Funky Junk Interiors, Tatertots and Jello, Chic On A Shoestring Decorating, The Shabby Nest, Finding Fabulous,
The living room had a big, beautiful fireplace as it's main focal point with a deep mantle, a giant mirror above it and flanked by tall windows and 10' ceilings. But front and center were large mauve tiles covering the face and the hearth. I lived with it for as long as I could, but, sooner than later, it had to go. And I had to figure out a way to do it without any major demolition. The only choice was to cover it up! Hide the mauve and create a clean, contemporary facade that would blend seamlessly with the rest of the house.
We had already tackled one fireplace makeover...
We had already tackled one fireplace makeover...
 ...so there was no doubt we could do it again!
Here is a picture of the fireplace in all of it's mauve glory!

And here is a picture of it before we moved in!
Yikes!
(sorry for the grainy picture - it was scanned from the "For Sale" flyer)

We had been given some 12" slate tiles from my best friend who had recently done a huge kitchen renovation. She didn't need the remaining 8 tiles that she had, so being resourceful I took them off her hands knowing that we could definitely use them!
The first step was to break out the tiles that were acting as the hearth of the fireplace. This was the only "demo" that was done on the entire project. It was a bit messy, but it only spans about 5 feet, so it wasn't that bad.


After the tiles and mortar had been chipped away we laid the new slate tiles. We don't have a tile saw, so my husband took 3 of the tiles to Lowe's and had them make a few cuts for us. Super easy and FREE!
We then cut and nailed a thin strip of MDF around the existing mauve tiles. This would act as a frame that we could attach our facade to. You can see in this picture the newly laid tiles and the frame going up!

We then measured and cut a sheet of 3/4" MDF to completely cover the old mauve tiles.
Oh, Happy Day!!
The fireplace wasn't even pretty yet and I already felt better in the room!

We then marked the facade for where we wanted our decorative panels to go.

We cut out squares for each corner and rectangles for the top and sides to add a decorative flair to the fireplace. The sides of the square and rectangle panels were routered with a "Roman Ogee" bit to make them look similar to all of the existing trim and wainscoting throughout the house. We added decorative strips of MDF around the base to help it tie in with our existing base boards.

We spackled all of the cut edges of the MDF so that we could ensure a clean finish!

One coat of primer and several coats of semi-gloss paint later, we were nearly finished!

I decided that the mauve tiles weren't the only thing about the fireplace that needed some help. We have a HUGE mirror above the fireplace, but it was really lacking character and it didn't feel much like an asset at all. I needed a quick, easy, and most of all cheap way to make it a real focal point.
My idea: use fence paneling to create a frame and use spray stain to give it a dark finish.
(My husband thought I was crazy - seriously, fence paneling?)
I love the rustic nature of fence paneling. And I really love that it costs $1.50 per panel! That's right...$1.50! So I bought 4 fence panels and one can of spray stain for about $10. All told my frame cost about $16.00! Nice! Even my frugal husband couldn't say "no" to that!
Here are a couple of panels propped up on the mantle before the stain and cuts were made...

And here it is "after"...
 The whole project took us about a day and a half to complete.
It was SO worth it! Since we got the tiles from a friend and used MDF instead of real wood, the cost was minimal.
And the best part?
No one has to know that the mauve tiles were ever even there!
It's our little secret!
 Two months after we moved into this house we started on the first of two fireplace makeovers. The fireplace surround in our family room consisted of some small, white trim around the brick and a very small, low profile mantle ledge about 6" above the trim. The ledge was only about 4" deep and pretty much unusable as a mantle. The look was so different from the fireplace in our living room that it just felt like there was a disconnect that happened somewhere in the original planning. The living room fireplace is big and grand while the family room's fireplace surround was small and barely noticeable. So, naturally, we had to fix that!
 We (and by "we" I mean my handy man husband!) took down the mantle ledge, but left the white trim that surrounded the brick. We could use that in our design. We proceeded to build up the surround piece by piece to make it more of a presence in the room. Fluted columns were added to the sides and planks of MDF were stacked on top to make the support for the mantle.
 Even the small details on this ended up making a big difference...
The original plan was to stop after adding the new mantle, but I decided that it needed something more...
 My handy man built a frame for above the mantle to house beaded board and more trim. The next step was to paint it all out in white. That's where I come in...
 The finished product!
 It makes such a huge difference in this room and now the family room and living room have a cohesive look.
Many thanks to my handy man for all of his hard work on this!
XOXOX
Subscribe to:
Posts (Atom)


